Actions I: The Basics
Web Lite’s actions framework allows you to customize existing actions (e.g. new, edit, find) and create your own new actions.
A data-driven application is composed of two primary elements:
- The data that it stores and displays
- The actions that manipulate and output the data to the user
Up until now we have focused on the first aspect - the data - but the second aspect is equally important, as it dictates how the application will be used.
A generic Xataface application provides some core actions like “Find”, “View”, “Edit”, and “Delete”, but most applications will require some custom actions also. Some such custom actions might include:
- Creating a calendar view to display event records
- importing/exporting a specific data type.
- a custom search
- an RSS feed generator or aggregator
- a web service
Xataface’s action framework makes it easy to add custom actions, or even modify existing actions without having to change the source code.
Creating a Hello World! action
Let’s create an action that simply displays “Hello World” on the screen. The steps are as follows:
- Add a file named “actions.ini” to your application’s directory.
-
Enter the following into this new “actions.ini” file:
[hello] template=HelloWorld.html -
Create a template in your application’s templates directory named “HelloWorld.html” with the following content:
Hello World!! - Now let’s point our web browser to your application with the query string: “?-action=hello”. i.e. http://yourdomain.com/path/to/your/app/index.php?-action=hello . This tells your application to perform our “hello” action that we just created.
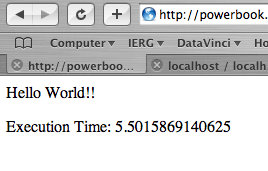
Now, this was a very basic action, and it isn’t very pleasing to the eyes. It does serve as a good example of how easy it is to create custom actions using Xataface. Just make an entry in the actions.ini file specifying the template to use, and create the template in the templates directory.
Applying the application’s look & feel
At this point our “hello” action doesn’t even use the application’s header and footer. This is usually a minimum requirement you’ll want for your custom actions. Xataface’s templating system will accomodate this. Modify the HelloWorld.html template as follows:
{use_macro file="Dataface_Main_Template.html"}
    {fill_slot name="main_section"}
        Hello World!!
    {/fill_slot}
{/use_macro}
Some explanations are in order. What this does is displays the Dataface_Main_Template.html template (the main template used to display every page in your application), but replaces the main_section slot with the contents defined in this template - namely “Hello World!!”. (If you look at the source for Dataface_Main_Template.html, you will notice a number of {define_slot} tags. These are sections of the template that can be overridden if the template is used as a macro, as we have for the HelloWorld.html template.
Now let’s look at our action (pointing the browser again at http://yourdomain.com/path/to/your/app/index.php?-action=hello.
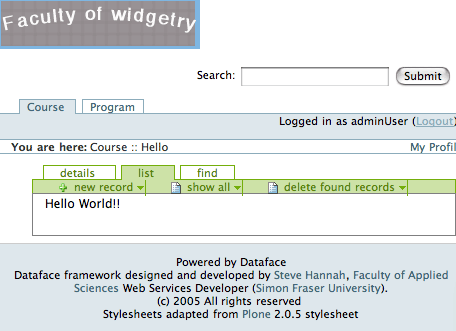
Now that looks a little better. One thing, though, is that we don’t really need the “details”, “list”, and “find” tabs for this action since they dont’ really have a meaning for our hello world action. Looking at the source for the Dataface_Main_Template.html template, we notice that there is another slot defined named “main_column” that includes the entire main section of the page, including the “details”, “list”, and “find” tabs. We can override this entire section by changing the HelloWorld.html template to the following:
{use_macro file="Dataface_Main_Template.html"}
    {fill_slot name="main_column"}
        Hello World!!
    {/fill_slot}
{/use_macro}
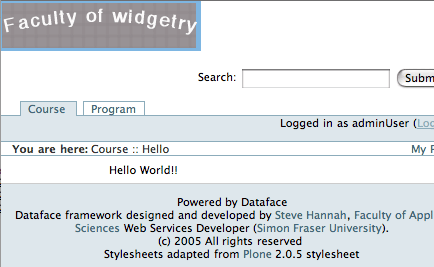
And now our application becomes:
Creating an Action Controller Class for your Action
The above Hello World example is very simple in that it only allows you to specify a template to be displayed for your action. What if you need to do some more complex work in your action (e.g. perform SQL queries or connect to a web service? For these sorts of things you will probably need to be able to use PHP - not just a Smarty template.
Let’s augment our above example with an action controller class written in PHP.
What is an action controller class?
An action controller class is a PHP class that is stored in your application’s actions directory that follows the naming convention actions_%ACTION_NAME% and defines a method named handle() which handles requests for that action.
An example action controller class for the Hello World action:
In a the file located at %APPLICATION_PATH%/actions/hello.php:
<?php
class actions_hello {
    function handle(&$params){
        echo "Hello World from the controller class!!";
    }
}
?>
This controller class will override the default functionality for our hello action, so that if we enter the url (http://yourdomain.com/path/to/your/app/index.php?-action=hello) into our web browser we will now see something like:
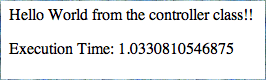
Notice that it is no longer “nice” looking inside the frame of the site’s look and feel. We can remedy this by changing our controller class to display the HelloWorld.html template that we designed above. We do this by changing the actions_hello class to:
<?php
class actions_hello {
    function handle(&$params){
        df_display(array(), 'HelloWorld.html');
    }
}
?>
Then our application will once again look like:
One thing worth noting is that we no longer need to include the “template” attribute in the actions.ini file for our action if we are using an action controller.
Accessing Application Information from your Action Controller
In order to do anything interesting, you will probably need to have access to some information about the application’s current state. For example:
- Which table is currently being viewed?
- Is the user logged in? If so, who is he?
- The database handle to be able to do database queries.
- Which record is currently selected - or what is the current found set?
There is much more information that you may want to access, but almost all of it is available via the Dataface_Application object.
Here is an example of how to get some of this information:
<?php
class actions_hello {
    function handle(&$params){
        $app =& Dataface_Application::getInstance();  // reference to Dataface_Application object
        $auth =& Dataface_AuthenticationTool::getInstance(); // reference to Dataface_Authentication object

        $request =& $app->getQuery();  // Request vars:  e.g. [-table]=>'Students', [-action]=>'hello'
        $user =& $auth->getLoggedInUser();  // Dataface_Record object of currently logged in user.

        $current_tablename =& $request['-table'];

        $current_record =& $app->getRecord();  // Currently selected record (Dataface_Record object)
        $results =& $app->getResultSet();  // Current found set (Dataface_QueryTool object).

        // Iterating through the results
        $it =& $results->iterator();
        while ($it->hasNext() ){
            $record =& $it->next(); // $record is a Dataface_Record object
            print_r($record->strvals());
            unset($record);  // necessary so that PHP doesn't just keep overwriting the same object.
        }

        // Perform a custom SQL Query:
       $res = mysql_query("select * from foo inner join bar on foo.x=bar.y", $app->db());
       // .. etc ...

       // Obtain parameters from the actions.ini file for this action:
       $template_name = $params['action']['template'];  // The value of the template parameter

       df_display(array(), $template_name);  // this form allows you to change the template to use by modifying the actions.ini file.

    }
}
?>
| Previous: Changing the Look and Feel | Up to Contents | Next: Actions II: Intermediate | | — | — | — |